Neutrogena Acne Correct & Cover Review

As summer begins to wind down, I always like to rethink my skincare routines and try new products. Neutrogena recently released their Oil-Free Acne Correct & Cover pink grapefruit moisturizer, which really sparked my interest. I haven’t ever been a huge fan of BB creams, because I prefer either powder foundations or cream foundations. But this moisturizer seemed especially intriguing because it claims to correct acne, so I thought it was worth a try.

As a seasoned pro when it comes to dealing with acne, I was super excited to see that this moisturizer contains salicylic acid, which it a powerful ingredient in treating acne. I also liked that this moisturizer is tinted, so I thought it might be similar to a BB cream. That way, I can skip the foundation for a more natural look.

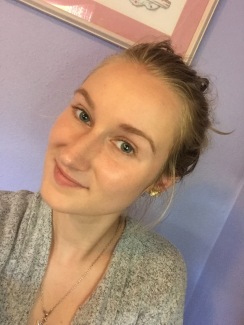
The first thing I noticed when I first applied this moisturizer is the color. I have light skin, but it is warm-toned. This moisturizer matched my skin tone exceptionally, but that is completely by chance. If I applied this on my cool-toned, fairer skinned sister, it would not match AT ALL. Since this moisturizer only comes in two shades, I don’t see how anyone who doesn’t perfectly match the shade could wear it without applying makeup after.

Another important note is that this is NOT anything like a BB cream. I have the Smashbox BB cream, which has relatively good coverage, but this is certainly much more of a moisturizer than anything else. Now I realize that a tinted moistuizer is much different than a BB cream, but I wasn’t expecting such light coverage. When Neutrogena says this product has sheer coverage, they mean it!

I love that this product allows me to embrace my skin while working throughout the day to protect against acne. I get hormonal breakouts, but my skin is usually clear the rest of the time. I would never actually use this product during the time of my breakout, because I prefer higher coverage to cover my acne. However, this product is a great replacement for the powder foundation I regularly use. I also saw that some people recommended it as a primer to wear underneath foundation. I haven’t tried that, but that sounds like it would do the trick.

This is the kind of product I wish I could have worn back when I was eleven years old. My mom didn’t let me wear makeup until I was fourteen, but I had acne starting at around age eleven. This is a great product for young girls who aren’t ready to wear full face foundation but still want something to help with their acne.

IMG_7717
After applying the moisturizer

While I don’t see this product being a perfect match for a lot of users, I do believe it is a holy grail product for a very specific target market. That being said, I think it is worth a try if you struggle with occassional breakouts and aren’t into wearing full face foundation.

IMG_7735
Full makeup using only moisturizer, blush and highlighter for my face

This product is great for:

  • Girls with warm-toned light skin (or medium skin for the other shade)
  • Occasional breakouts
  • Those who like sheer coverage
  • Young teens who aren’t yet wearing full makeup

XOXO,

Ali

I like to follow back:)

Instagram  Twitter

Makeup Storage Cabinet

Hey guys, I just wanted to share with you all my newest DIY project! I have been accumulating more and more makeup, and I haven’t had nearly enough room for it all! I have a small vanity, but it isn’t big enough to store all of my makeup.

My parents were remodeling their kitchen cabinets, so all of the old kitchen cabinets ended up in my dad’s shop. One day I happened to be out there, and noticed how many cabinets he had. I had been looking for a makeup storage cabinet for a while, but I couldn’t justify paying $75 for something to store makeup. When I saw the extra cabinets, I immediately thought of turning it into a makeup cabinet. It was the perfect size to fit in my room! The only problem was that it was the wrong color; all of the furniture in my room is dark brown, so that needed to be changed!

My dad was excited to help me revamp my cabinet, so we worked to sand it down and then paint the wood. It ended up looking just the way I wanted it to, and the best part was that rather than spending $75 on a cabinet, all I spent was $10 on paint!

I was super excited to share my cabinet with you, and would love to hear about your favorite DIY projects!

Anastasia Glow Kit Review

Walking around Sephora, it seems that every cosmetics brand has its own marketed highlighter. While they differ in packaging, it can be difficult to figure out which one is best suited for you. Of course, skin tone and formulation play a role in selecting the  best highlighter, but what if that highlighter actually comes with FOUR shades?? I was curious about the Anastasia Glow Kit because I wanted to figure out if all four shades were actually worth the price.

I’ve used Nars Albatross for a couple years as a cheekbone highlight, but I wasn’t ever into highlighting my entire face. Since struggling with oily skin since high school, I didn’t find the strobing technique of heavy highlighting very appealing. However, summer is in full swing and it seems like I need some more glow in my life. And by glow, I mean the Anastasia Glow Kit!

There are two different Glow Kit palettes; I have “That Glow,” which a Sephora associate recommended for my fair skin. It comes with four very well pigmented highlighters. I would except four full-size highlighters to run about $80-$120, but this palette is only $40. That means that each highlighter is $10!!

IMG_7429

Not only is this palette cost efficient, but the color payoff is exceptional, and the shine is incredible!! If you are looking for a subtile highlight, you can sweep a small amount on your cheekbone for a quick pick-me-up, or you can full-on strobe your face. I’m not a fan of the highlighters that have sparkles in them because I think they look tacky, but these ones are creamy and have a frosty satin finish, so they look very natural.

I have been wearing these highlighters to work and every day that I do, I get multiple customers complimenting me on how great my skin is!

IMG_7430

IMG_7432
From Left to Right: Dripping in Gold, Bubbly, Golden Bonze, Sunburst
IMG_7433
From top to bottom: Dripping in Gold, Bubbly, Golden Bronze, Sunburst

Sunburst is a light cream shade, it can appear white on the skin so it reminds me of Nars Albatross. I use this shade to highlight my chin, tip of my nose, and the tops of my cheekbones.

Bubbly and Dripping in Gold are so so similar it’s hard to tell them apart. Bubbly is a tad bit pinker, and Dripping in Gold leans more on the gold side. I like to mix the two to give a bit more dimension. I use these shades on my cheeks after I apply my blush, and on the sides of my forehead.

Golden Bronze is what the baby of a highlighter and a bronzer would look like. It is super shimmery, but also has a beautiful chocolate brown texture. On me it sheers out quite a bit, but my fairer-skinned sister can use this shade as a bronzer. I like to use this product underneath the area I apply my blush to make my cheekbones appear lifted. However, this shade would also look super chic when layered over a matte bronzer.

Overall, I think this palette is a must! It is the perfect compliment to sun-kissed summer skin, and can certainly be used all year around for a healthy-looking glow.

IMG_7518


The Perfect Brush Set

There is no such thing as a universal makeup brush collection. Everyone has their own wants and needs when it comes to the brushes in their vanity. I have a couple specific eye makeup brushes that have remained the staple for my everyday looks for a while now, and the size and shape of them creates a fabulous look for my eyes.

For Valentine’s Day my momma sent me the best gift ever–a new Real Techniques brush set! I was so excited to start using my new brushes, and now that I have been using my brush set for a while, I thought it was time for me to write a post so I could share how much I love them!


My favorite brush in the collection is the eyeliner brush. It is perfect for getting polished wings since the brush tip is so precise. I use this brush every day, and highly recommend using an eyeliner brush with a definite point rather than one that’s slanted. It will give you much better control, especially if you use gel eyeliner like I do!

Another brush I use on the daily is the highlighter brush. It is perfect for ladies who use powder highlighter. I illuminize with the Nars Albatross (a true love of mine:)) every day, so this brush gives me a perfect application.

The eyeshadow brush is a staple in my eye routine. I like to layer on a couple eyeshadows to get just the right look, and this one is great for applying the frosted shadow I use at the end of my routine. I have another brush by Sonia Kashuk that I prefer for an all-over-the-lid application, but this one is great for any glittery or frosted shadows.

The blush brush is also awesome! It’s super soft and gives a very delicate application, so it’s perfect for heavily pigmented blush formulas. Unfortunately I haven’t had the opportunity to use the foundation brush much, since I prefer to blend foundation with my fingers rather than with brushes. However, I have used it with a matte highlighter a couple times and I can say it gives an even application.